Let’s use vertex buffer objects and the
touchscreen to create a fun new app. Instead of relying on triangles like
we’ve been doing so far, we’ll use GL_LINES Figure 1. The rotation in Touch Cone was
restricted to the plane, but this app will let you spin the geometry topology to
create a simple wireframe viewer, as shown in
around to any orientation; behind the scenes, we’ll use quaternions to
achieve a trackball-like effect. Additionally, we’ll include a row of
buttons along the bottom of the screen to allow the user to switch between
different shapes. They won’t be true buttons in the UIKit sense; remember,
for best performance, you should let OpenGL do all the rendering. This
application will provide a good foundation upon which to learn many OpenGL
concepts.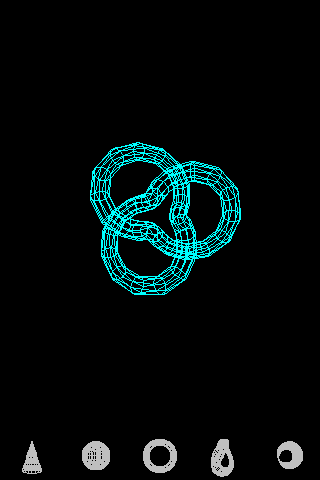
If you’re planning on following along with the
code, you’ll first need to start with the WireframeSkeleton project from
this book’s example code (available at http://oreilly.com/catalog/9780596804831). In the Finder,
make a copy of the directory that contains this project, and name the new
directory SimpleWireframe. Next, open the project (it
will still be named WireframeSkeleton), and then choose Project→Rename. Rename it to SimpleWireframe.
This skeleton project includes all the building
blocks you saw (the vector library from the appendix, the
GLView class, and the application delegate). There are
a few differences between this and the previous examples, so be sure to
look over the classes in the project before you proceed:
The application delegate has been renamed
to have a very generic name, AppDelegate.
The GLView class uses an
application engine rather than a
rendering engine. This is because we’ll be taking
a new approach to how we factor the ES 1.1– and ES 2.0–specific code
from the rest of the project; more on this shortly.
1. Parametric Surfaces for Fun
You might have been put off by all the work
required for tessellating the cone shape in the previous samples. It
would be painful if you had to figure out a clever tessellation for
every shape that pops into your head! Thankfully, most 3D modeling
software can export to a format that has post-tessellated content; the
popular .obj file format is one example of this.
Moreover, the cone shape happens to be a mathematically defined shape
called a parametric surface; all parametric
surfaces are relatively easy to tessellate in a generic manner. A
parametric surface is defined with a function that takes a 2D vector for
input and produces a 3D vector as output. This turns out to be
especially convenient because the input vectors can also be used as
texture coordinates.
The input to a parametric function is said to
be in its domain, while the output is said to be
in its range. Since all parametric surfaces can
be used to generate OpenGL vertices in a consistent manner, it makes
sense to create a simple class hierarchy for them. Example 1 shows two subclasses: a cone and a sphere. This
has been included in the WireframeSkeleton project for your convenience,
so there is no need for you to add it here.
Example 1. ParametricEquations.hpp
#include "ParametricSurface.hpp"

class Cone : public ParametricSurface {
public:
    Cone(float height, float radius) : m_height(height), m_radius(radius)
    {
        ParametricInterval interval = { ivec2(20, 20), vec2(TwoPi, 1) };
        SetInterval(interval);
    }
    vec3 Evaluate(const vec2& domain) const
    {
        float u = domain.x, v = domain.y;
        float x = m_radius * (1 - v) * cos(u);
        float y = m_height * (v - 0.5f);
        float z = m_radius * (1 - v) * -sin(u);
        return vec3(x, y, z);
    }
private:
    float m_height;
    float m_radius;
};

class Sphere : public ParametricSurface {
public:
    Sphere(float radius) : m_radius(radius)
    {
        ParametricInterval interval = { ivec2(20, 20), vec2(Pi, TwoPi) };
        SetInterval(interval);
    }
    vec3 Evaluate(const vec2& domain) const
    {
        float u = domain.x, v = domain.y;
        float x = m_radius * sin(u) * cos(v);
        float y = m_radius * cos(u);
        float z = m_radius * -sin(u) * sin(v);
        return vec3(x, y, z);
    }
private:
    float m_radius;
};

// ...
|
The classes in Example 1
request their desired tessellation granularity and domain bound by
calling SetInterval from their constructors. More
importantly, these classes implement the pure virtual
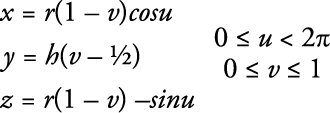
Evaluate method, which simply applies Cone parameterization or Sphere parameterization.
Cone parameterization
Sphere parameterization
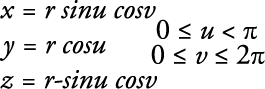
Each of the previous equations is only one of
several possible parameterizations for their respective shapes. For
example, the z equation for the sphere could be negated, and it would
still describe a sphere.
In addition to the cone and sphere, the
wireframe viewer allows the user to see four other interesting
parametric surfaces: a torus, a knot, a Möbius strip, and a Klein bottle (see Figure 2).
I’ve already shown you the classes for the sphere and cone. They basically do nothing more than evaluate various
well-known parametric equations. Perhaps more interesting is their
common base class, shown in Example 2. To
add this file to Xcode, right-click the Classes
folder, choose Add→New file, select
C and C++, and choose Header File. Call it
ParametricSurface.hpp, and replace everything in it
with the code shown here.

Example 2. ParametricSurface.hpp
#include "Interfaces.hpp"

struct ParametricInterval {
    ivec2 Divisions;
    vec2 UpperBound;
};

class ParametricSurface : public ISurface {
public:
    int GetVertexCount() const;
    int GetLineIndexCount() const;
    void GenerateVertices(vector<float>& vertices) const;
    void GenerateLineIndices(vector<unsigned short>& indices) const;
protected:
    void SetInterval(const ParametricInterval& interval);
    virtual vec3 Evaluate(const vec2& domain) const = 0;
private:
    vec2 ComputeDomain(float i, float j) const;
    vec2 m_upperBound;
    ivec2 m_slices;
    ivec2 m_divisions;
};
|
I’ll explain the ISurface
interface later; first let’s take a look at various elements that are
controlled by subclasses:
Example 3
shows the implementation of the ParametricSurface
class. Add a new C++ file to your
Xcode project called ParametricSurface.cpp (but
deselect the option to create the associated header file). Replace
everything in it with the code shown.
Example 3. ParametricSurface.cpp
#include "ParametricSurface.hpp"

void ParametricSurface::SetInterval(const ParametricInterval& interval)
{
    m_upperBound = interval.UpperBound;
    m_divisions = interval.Divisions;
    m_slices = m_divisions - ivec2(1, 1);
}

int ParametricSurface::GetVertexCount() const
{
    return m_divisions.x * m_divisions.y;
}

int ParametricSurface::GetLineIndexCount() const
{
    return 4 * m_slices.x * m_slices.y;
}

vec2 ParametricSurface::ComputeDomain(float x, float y) const
{
    return vec2(x * m_upperBound.x / m_slices.x,
                y * m_upperBound.y / m_slices.y);
}

void ParametricSurface::GenerateVertices(vector<float>& vertices) const
{
    vertices.resize(GetVertexCount() * 3);
    vec3* position = (vec3*) &vertices[0];
    for (int j = 0; j < m_divisions.y; j++) {
        for (int i = 0; i < m_divisions.x; i++) {
            vec2 domain = ComputeDomain(i, j);
            vec3 range = Evaluate(domain);
            *position++ = range;
        }
    }
}

void ParametricSurface::GenerateLineIndices(vector<unsigned short>& indices) const
{
    indices.resize(GetLineIndexCount());
    vector<unsigned short>::iterator index = indices.begin();
    for (int j = 0, vertex = 0; j < m_slices.y; j++) {
        for (int i = 0; i < m_slices.x; i++) {
            int next = (i + 1) % m_divisions.x;
            *index++ = vertex + i;
            *index++ = vertex + next;
            *index++ = vertex + i;
            *index++ = vertex + i + m_divisions.x;
        }
        vertex += m_divisions.x;
    }
}
|
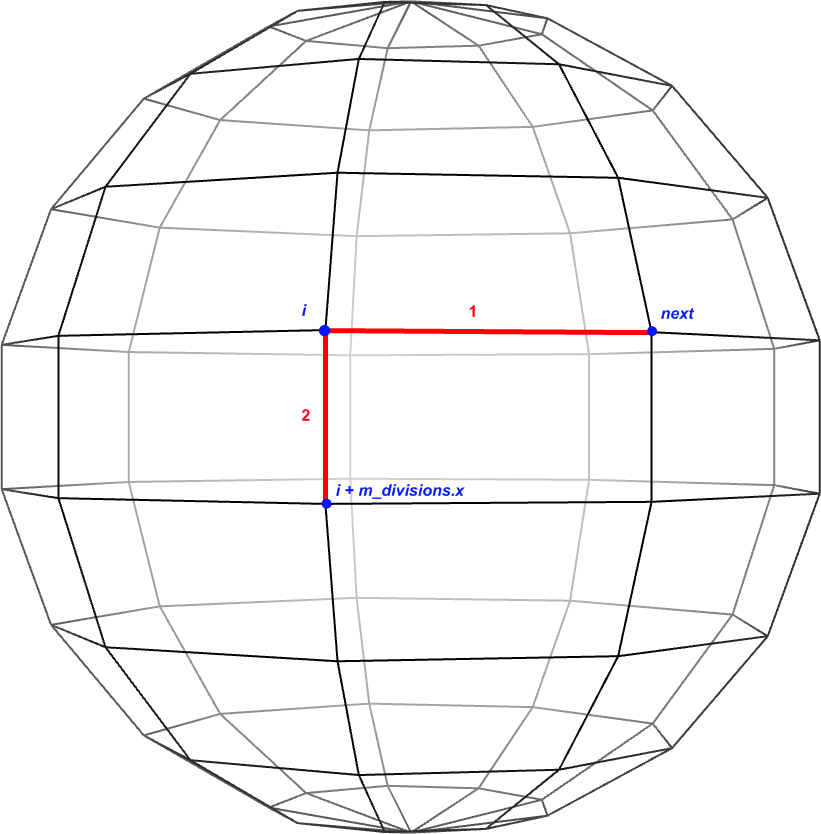
The GenerateLineIndices
method deserves a bit of an explanation. Picture a globe of the earth
and how it has lines for latitude and longitude. The first two indices
in the loop correspond to a latitudinal line segment; the latter two
correspond to a longitudinal line segment (see Figure 3). Also note some sneaky usage of the modulo
operator for wrapping back to zero when closing a loop.